Classification, Semantic Segmentation, Object Detection, and Instance Segmentation
Published on Saturday, 02-08-2025
(Adopted from CS224N)
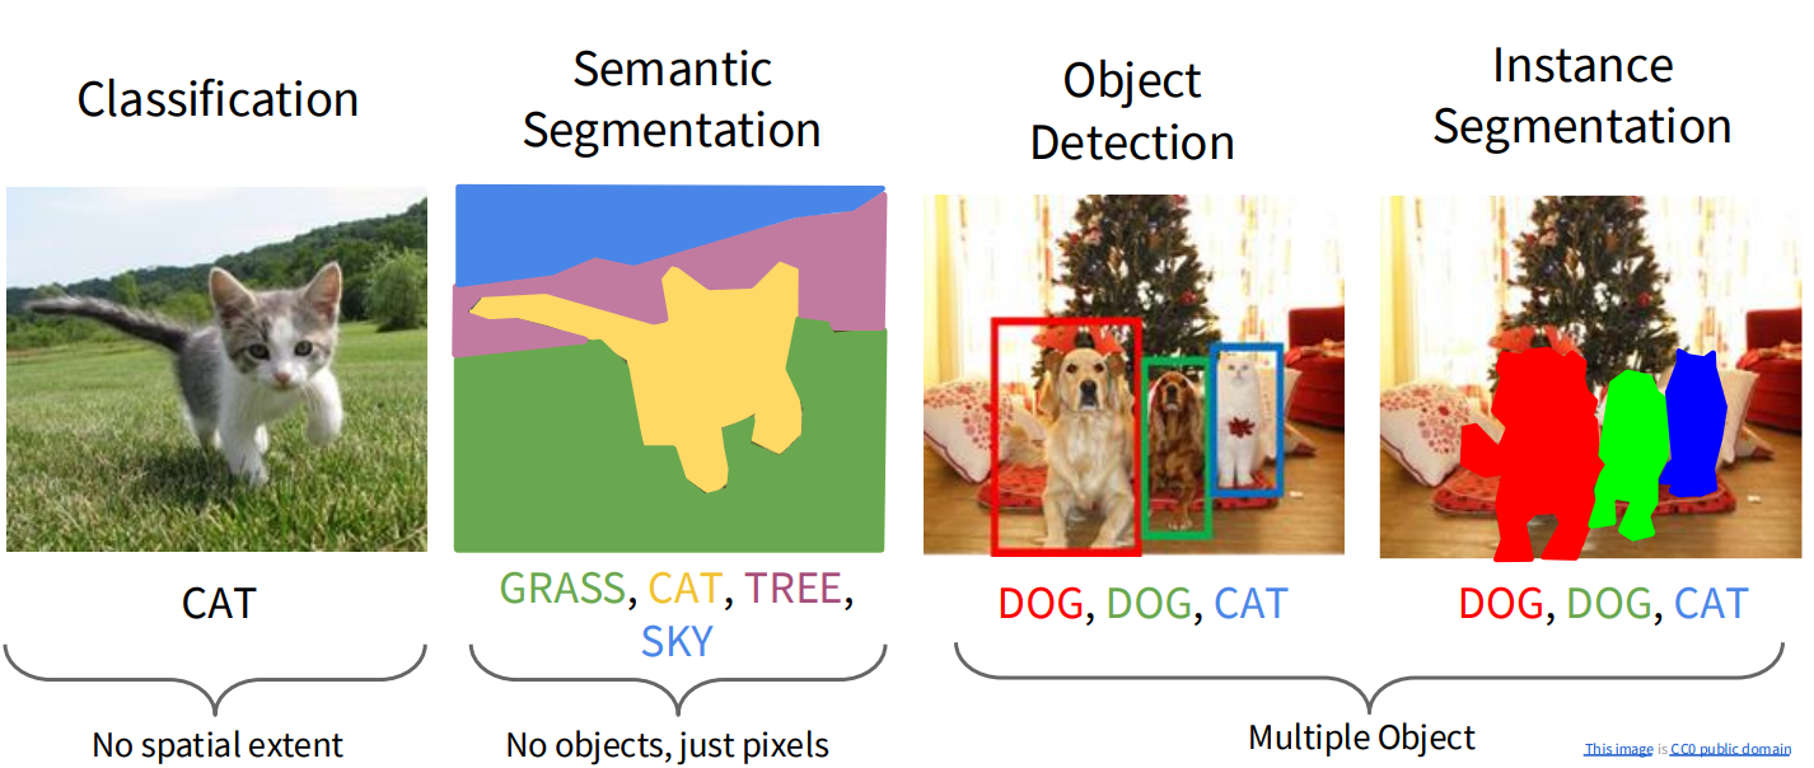
Classification, Semantic Segmentation, Object Detection, and Instance Segmentation
Computer vision enables machines to interpret visual data, such as images and videos, and is a cornerstone of artificial intelligence. This tutorial explores four fundamental computer vision tasks: Image Classification, Semantic Segmentation, Object Detection, and Instance Segmentation. Each section provides a detailed explanation, mathematical formulations with proper LaTeX syntax (using $ for inline and $$ for display equations), and PyTorch code examples for practical implementation. This version addresses potential Unicode escape sequence errors by removing problematic SVG data and cleaning repetitive code snippets.
1. Image Classification
Concept Explanation
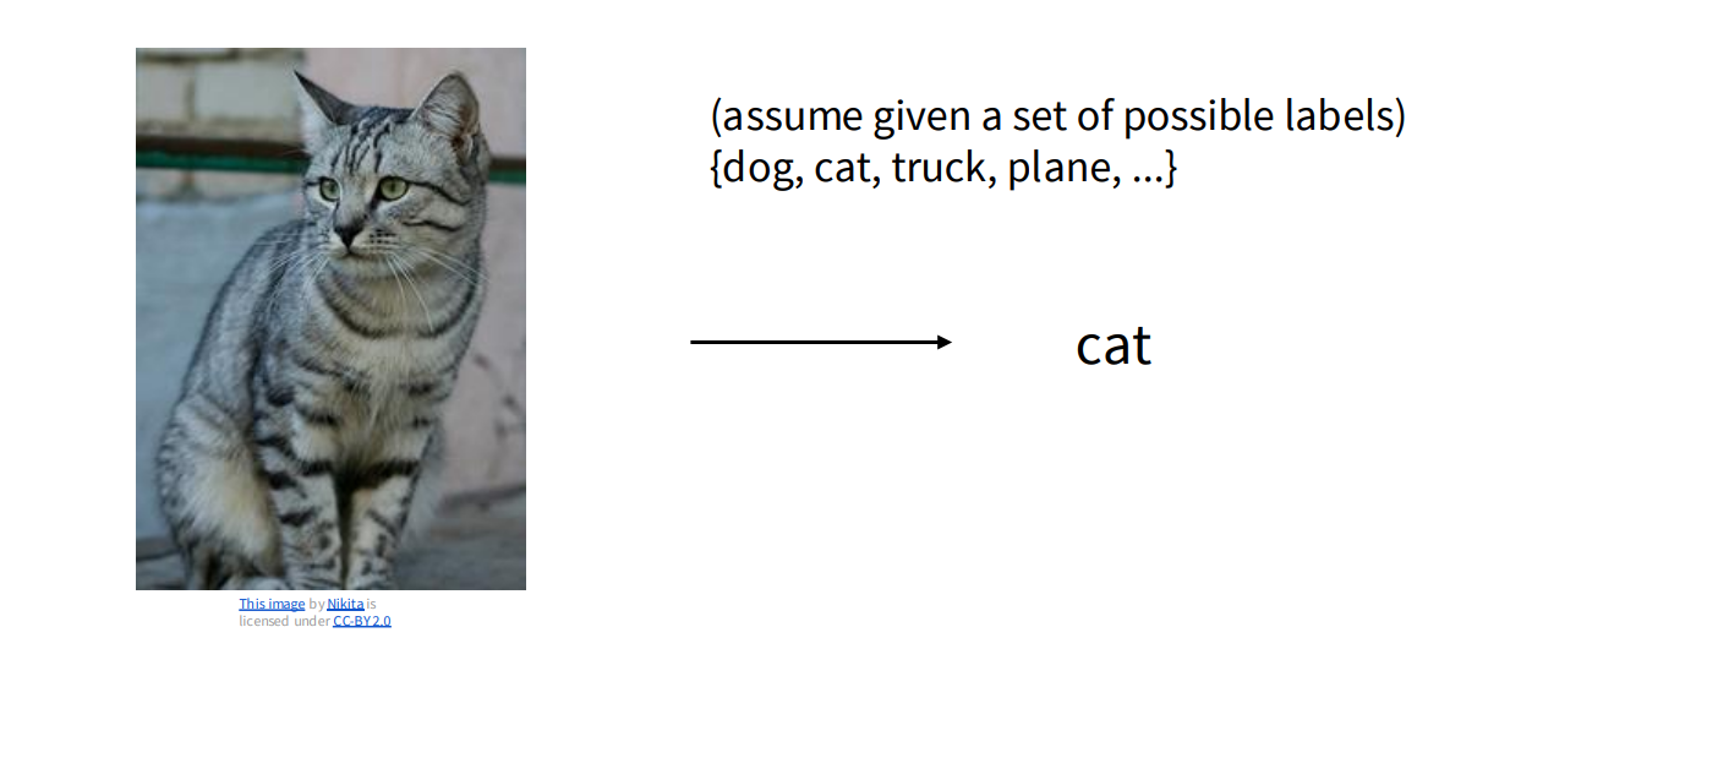
Image classification assigns a single label to an entire image from a set of predefined categories, such as “dog,” “cat,” “truck,” or “plane.” The input is a 3D tensor of shape , where is the height, is the width, and 3 represents RGB channels. The output is a probability distribution over classes.
Key Challenges:
- Variability: Images vary in lighting, angle, and occlusion.
- Feature Learning: The model must extract discriminative features (e.g., edges, textures).
- Overfitting: Complex models may overfit with limited data.
Approach: Convolutional Neural Networks (CNNs) process images through convolutional layers (feature extraction), pooling layers (dimension reduction), and fully connected layers (class scoring). A softmax layer produces probabilities, and cross-entropy loss guides training.
Mathematical Formulation: Given an image and classes , the model outputs:
where is the score for class . The cross-entropy loss is:
where if the true label is , else 0.
PyTorch Implementation
Below is a CNN for classifying CIFAR-10 images (10 classes).
import torch
import torch.nn as nn
import torch.optim as optim
import torchvision
import torchvision.transforms as transforms

# Define a simple CNN
class SimpleCNN(nn.Module):
    def __init__(self):
        super(SimpleCNN, self).__init__()
        self.conv1 = nn.Conv2d(3, 16, kernel_size=3, padding=1)
        self.conv2 = nn.Conv2d(16, 32, kernel_size=3, padding=1)
        self.pool = nn.MaxPool2d(2, 2)
        self.fc1 = nn.Linear(32 * 8 * 8, 128)  # For 32x32 input images
        self.fc2 = nn.Linear(128, 10)  # 10 classes

    def forward(self, x):
        x = self.pool(torch.relu(self.conv1(x)))
        x = self.pool(torch.relu(self.conv2(x)))
        x = x.view(-1, 32 * 8 * 8)
        x = torch.relu(self.fc1(x))
        x = self.fc2(x)
        return x

# Load CIFAR-10 dataset
transform = transforms.Compose([transforms.ToTensor(), transforms.Normalize((0.5, 0.5, 0.5), (0.5, 0.5, 0.5))])
trainset = torchvision.datasets.CIFAR10(root='./data', train=True, download=True, transform=transform)
trainloader = torch.utils.data.DataLoader(trainset, batch_size=32, shuffle=True)

# Initialize model, loss, and optimizer
model = SimpleCNN()
criterion = nn.CrossEntropyLoss()
optimizer = optim.SGD(model.parameters(), lr=0.001, momentum=0.9)

# Training loop (simplified)
for epoch in range(2):  # 2 epochs for brevity
    for images, labels in trainloader:
        optimizer.zero_grad()
        outputs = model(images)
        loss = criterion(outputs, labels)
        loss.backward()
        optimizer.step()
    print(f'Epoch {epoch+1}, Loss: {loss.item()}')
This CNN classifies CIFAR-10 images into one of 10 categories using two convolutional layers and fully connected layers.
2. Semantic Segmentation
Concept Explanation
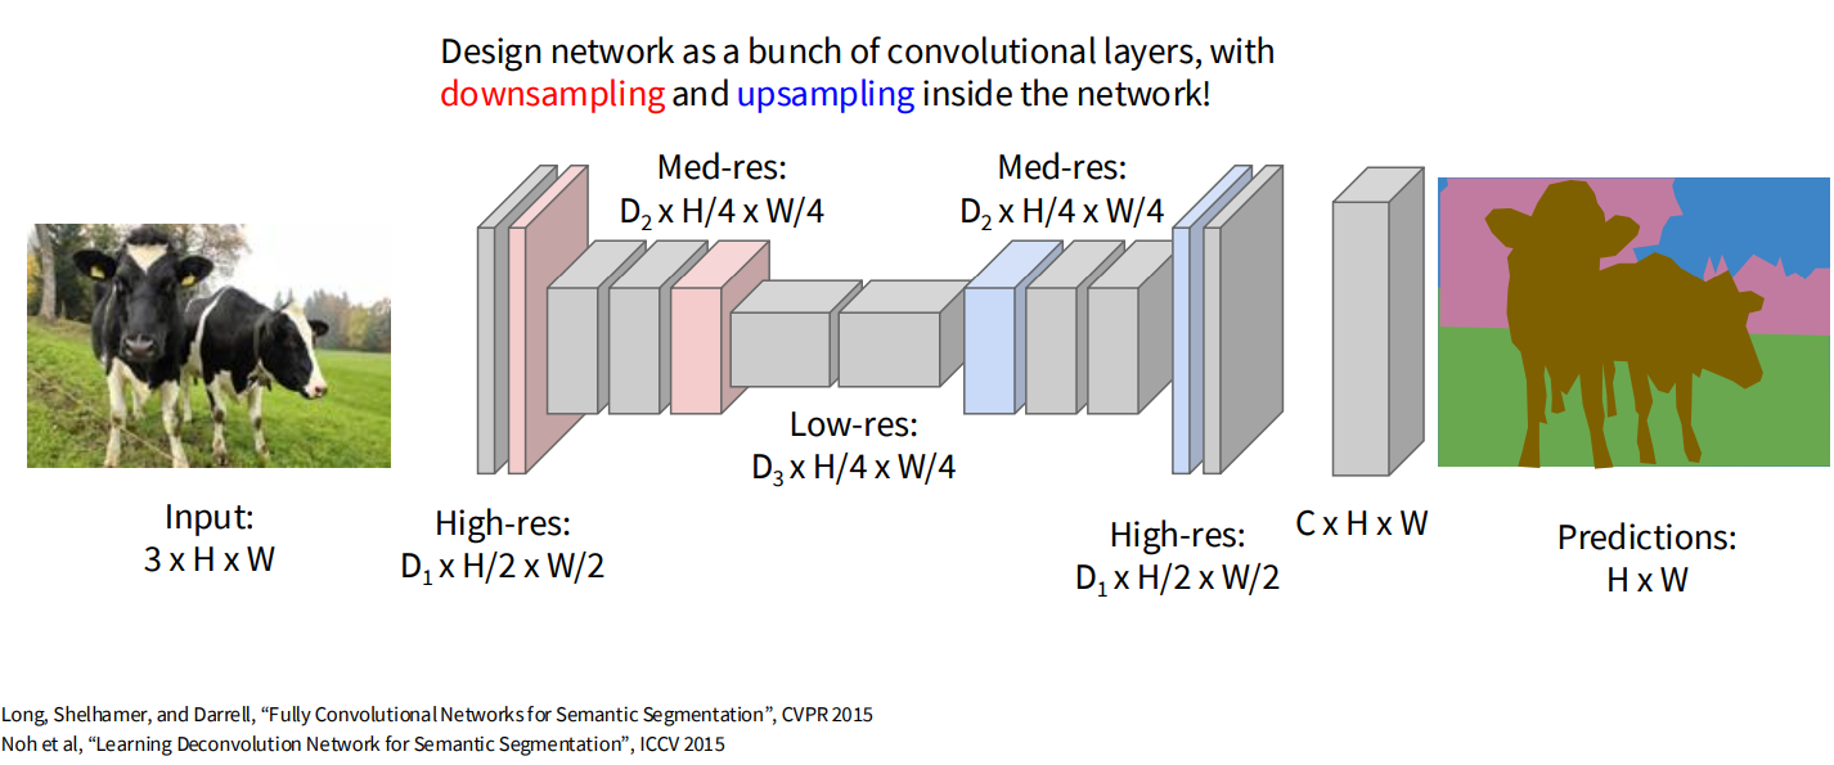
Semantic segmentation labels every pixel in an image with a category (e.g., “sky,” “tree,” “cow,” “grass”), producing a label map of size , where is the number of classes. It’s essential for applications like autonomous driving.
Key Challenges:
- Pixel-Level Precision: Requires accurate classification of each pixel.
- Spatial Information Loss: Pooling in CNNs reduces resolution, losing details.
- Computational Cost: Pixel-wise processing is resource-intensive.
Approaches:
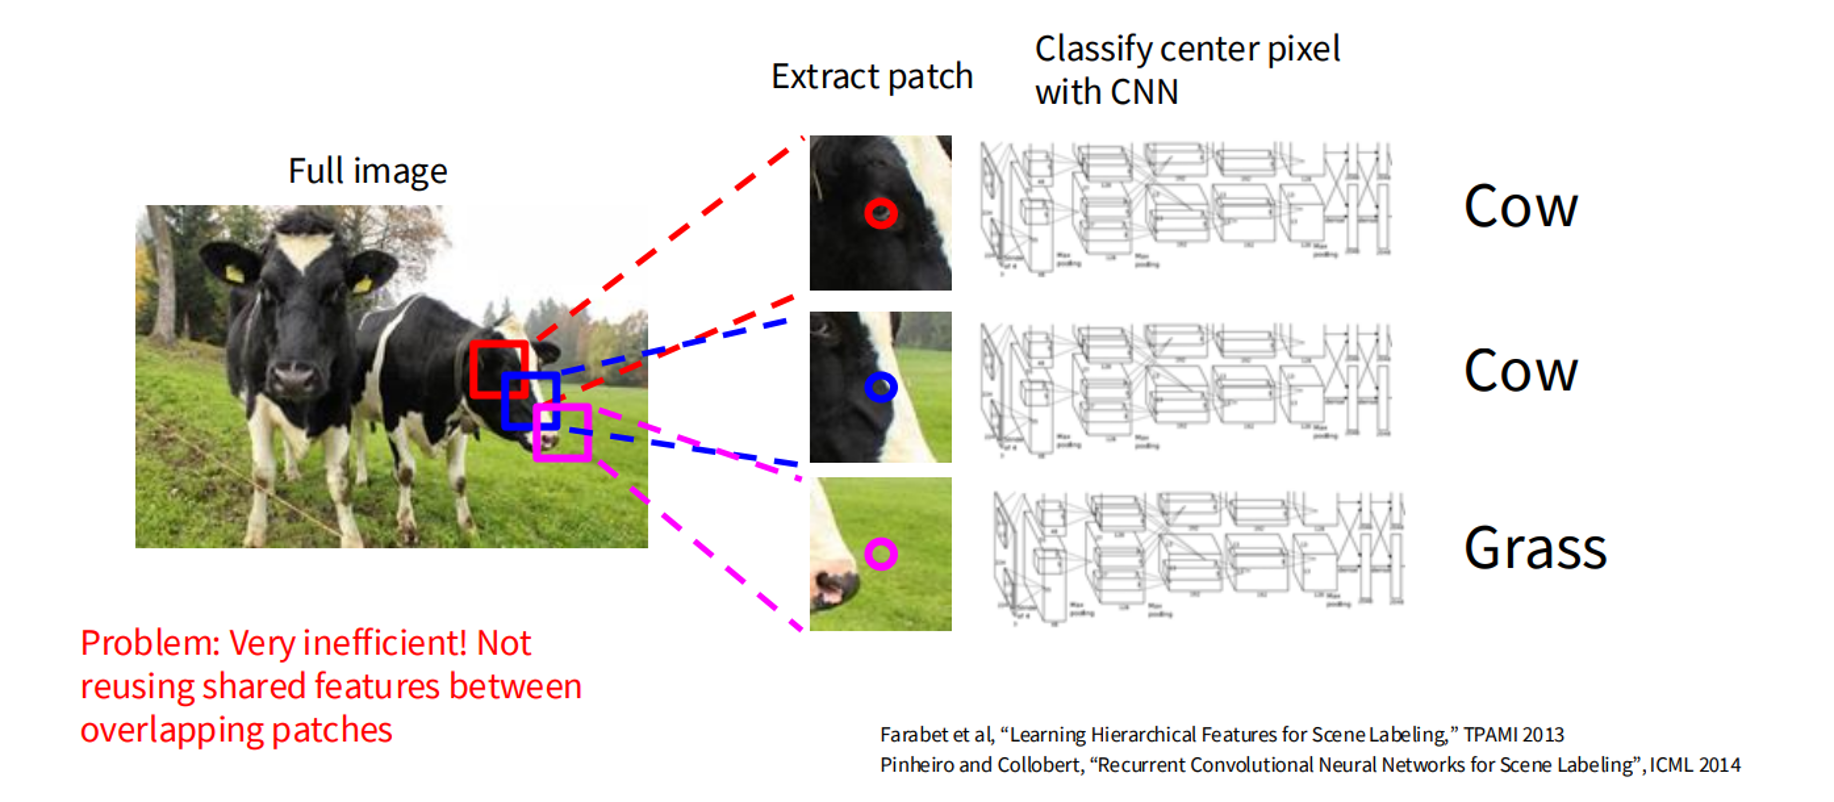
- Sliding Window: Classifies image patches but is computationally expensive.
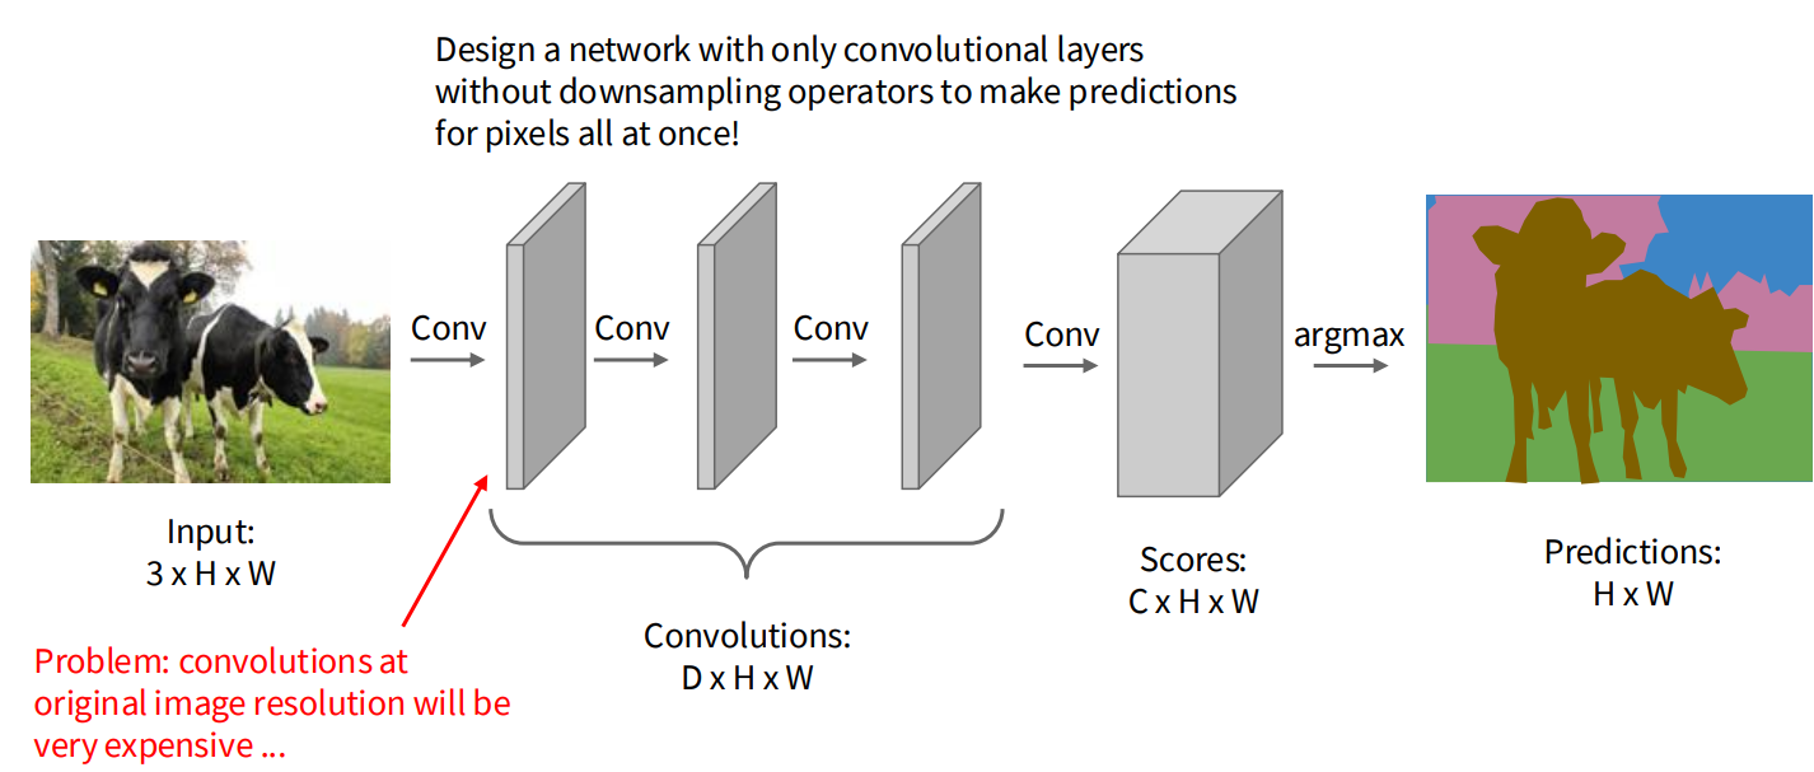
- Fully Convolutional Networks (FCNs): Use convolutional layers to maintain spatial dimensions, with downsampling and upsampling.
- U-Net: An encoder-decoder architecture with skip connections to combine context and details.
Mathematical Formulation: For an image of size , the model outputs a label map of size . The probability for pixel being class is:
The pixel-wise cross-entropy loss is:
Upsampling Techniques:
- Nearest Neighbor Interpolation: Copies pixel values to a larger grid.
- Transposed Convolution: Learnable upsampling via filter-input dot products.
- Max Unpooling: Uses max-pooling indices to restore values.
PyTorch Implementation
Below is a simplified U-Net for semantic segmentation with 4 classes.
import torch
import torch.nn as nn

class UNet(nn.Module):
    def __init__(self, in_channels=3, out_channels=4):
        super(UNet, self).__init__()
        def conv_block(in_ch, out_ch):
            return nn.Sequential(
                nn.Conv2d(in_ch, out_ch, 3, padding=1),
                nn.ReLU(),
                nn.Conv2d(out_ch, out_ch, 3, padding=1),
                nn.ReLU()
            )

        self.enc1 = conv_block(in_channels, 64)
        self.enc2 = conv_block(64, 128)
        self.pool = nn.MaxPool2d(2, 2)
        self.upconv = nn.ConvTranspose2d(128, 64, 2, stride=2)
        self.dec1 = conv_block(128, 64)
        self.final = nn.Conv2d(64, out_channels, 1)

    def forward(self, x):
        e1 = self.enc1(x)
        e2 = self.enc2(self.pool(e1))
        u = self.upconv(e2)
        u = torch.cat([u, e1], dim=1)  # Skip connection
        d = self.dec1(u)
        out = self.final(d)
        return out

# Example usage
model = UNet()
x = torch.randn(1, 3, 256, 256)
output = model(x)
print(output.shape)  # [1, 4, 256, 256]
This U-Net combines downsampling, upsampling, and skip connections to produce pixel-wise class predictions.
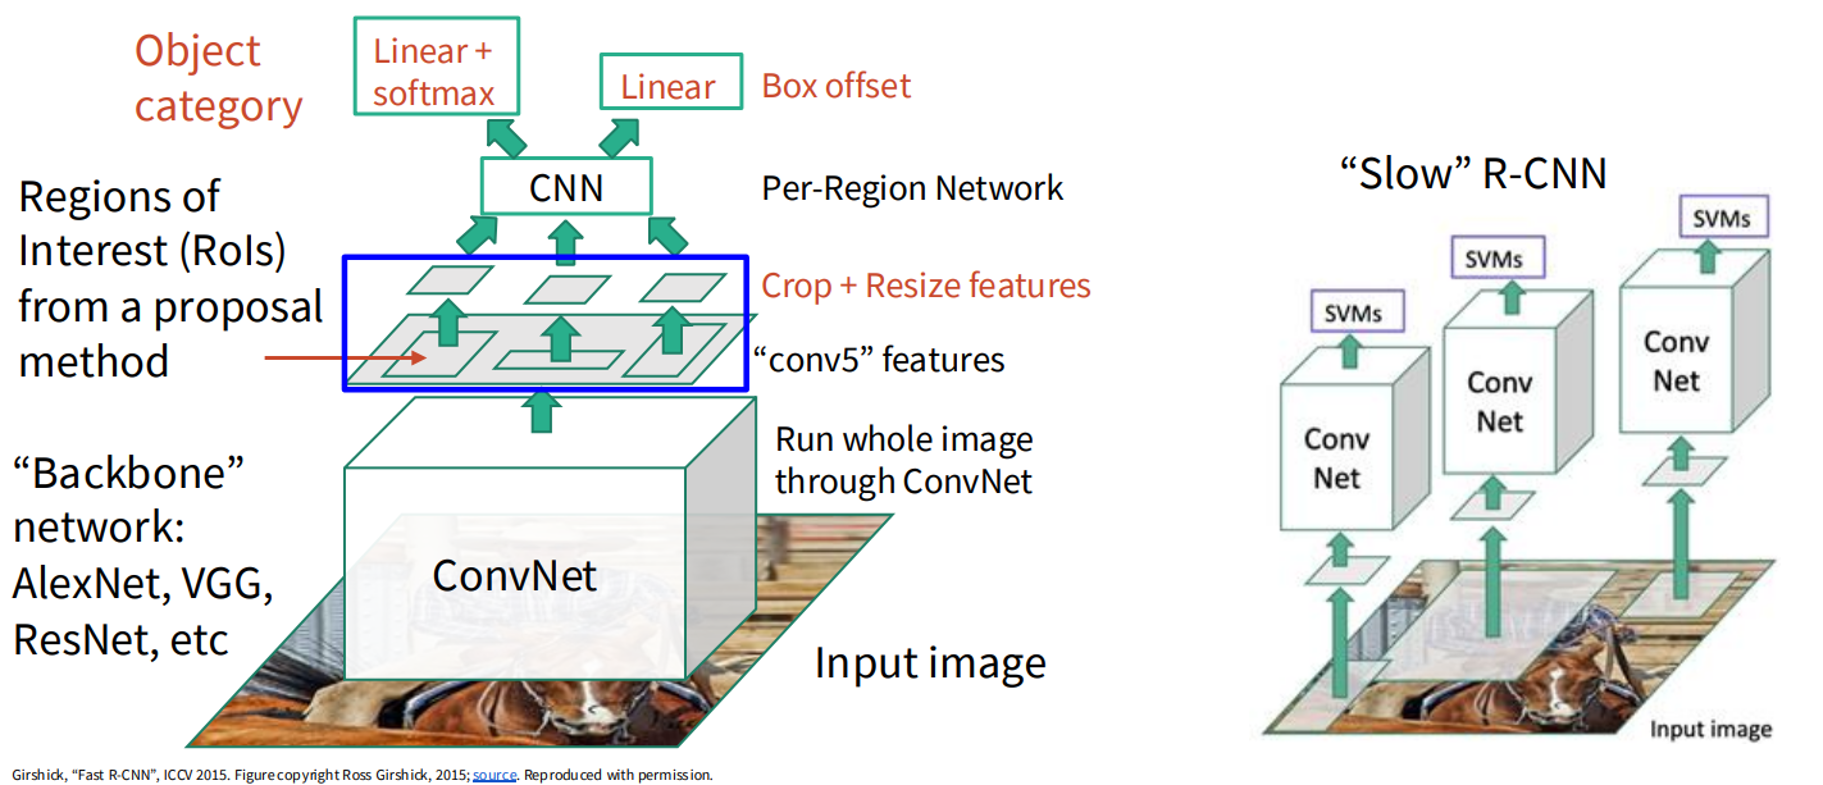
3. Object Detection
Concept Explanation
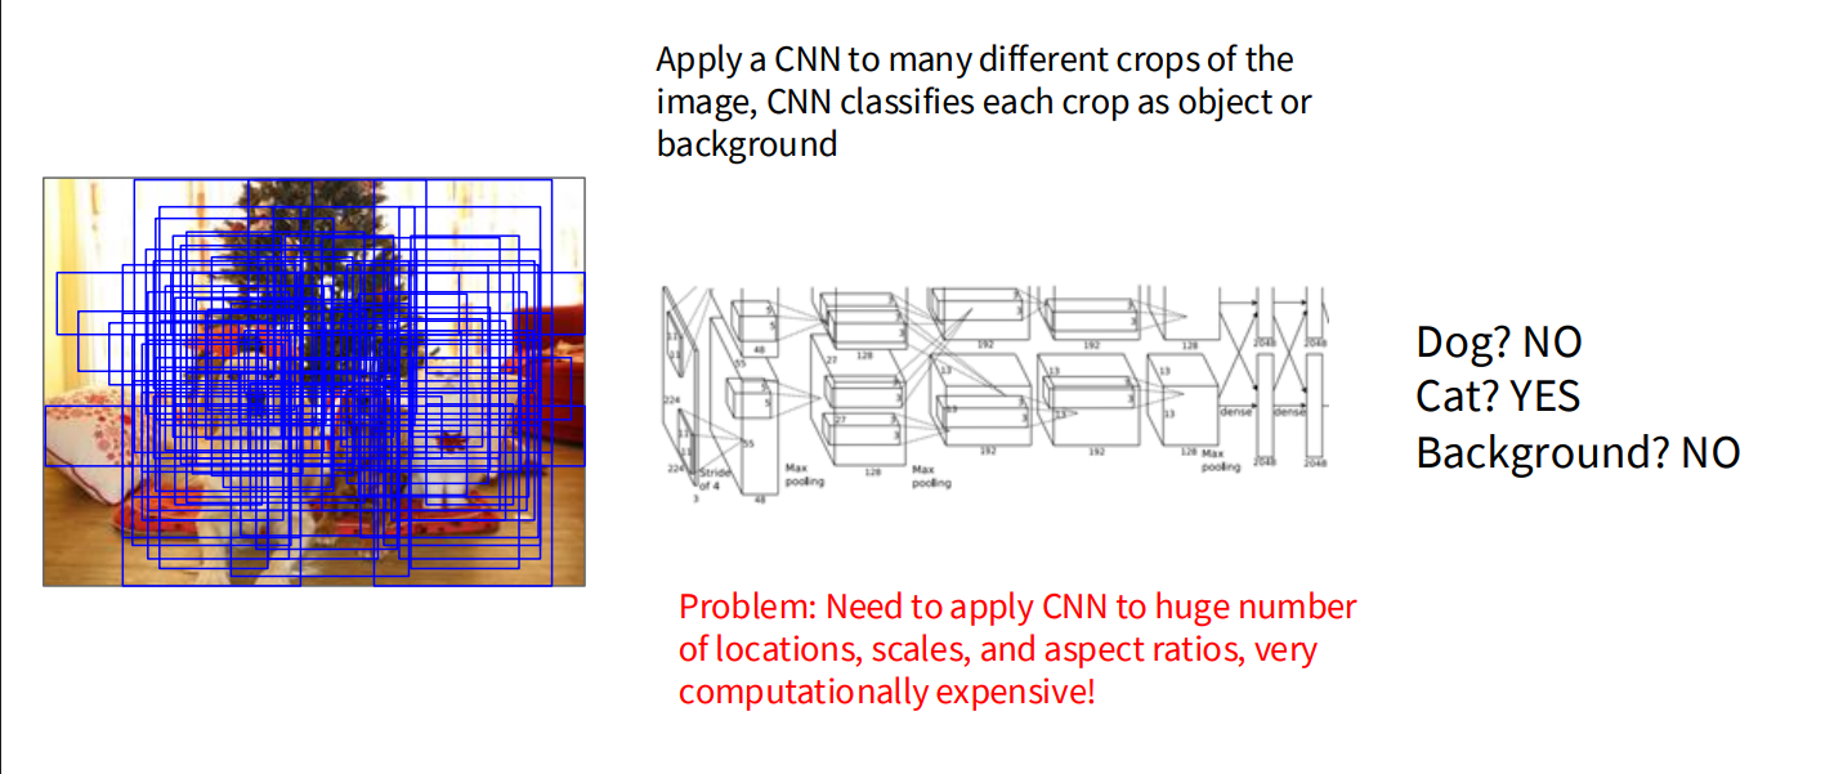
Object detection identifies and localizes objects by predicting class labels and bounding box coordinates . It handles multiple objects per image, unlike classification.
Key Challenges:
- Variable Outputs: Images have varying numbers of objects.
- Localization: Precise bounding box prediction is complex.
- Efficiency: Processing many regions is computationally expensive.
Approaches:
- Sliding Window with CNN: Applies CNN to image crops (inefficient).
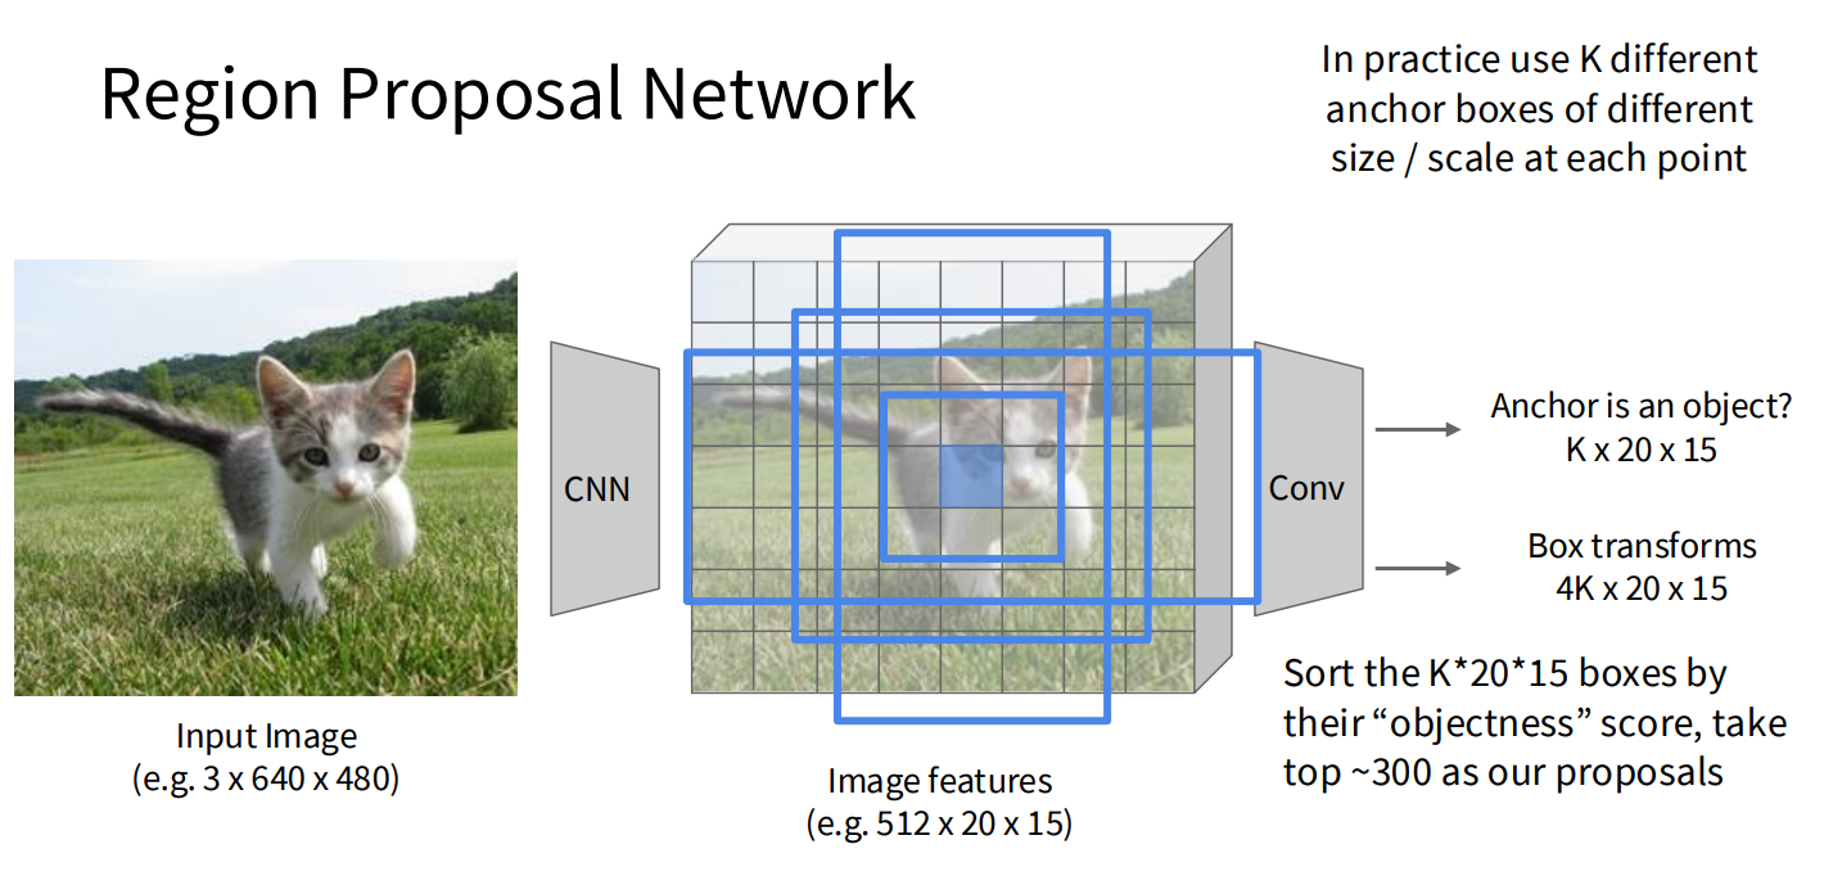
- Region Proposal Network (RPN): Generates anchor boxes for potential objects (used in Faster R-CNN).
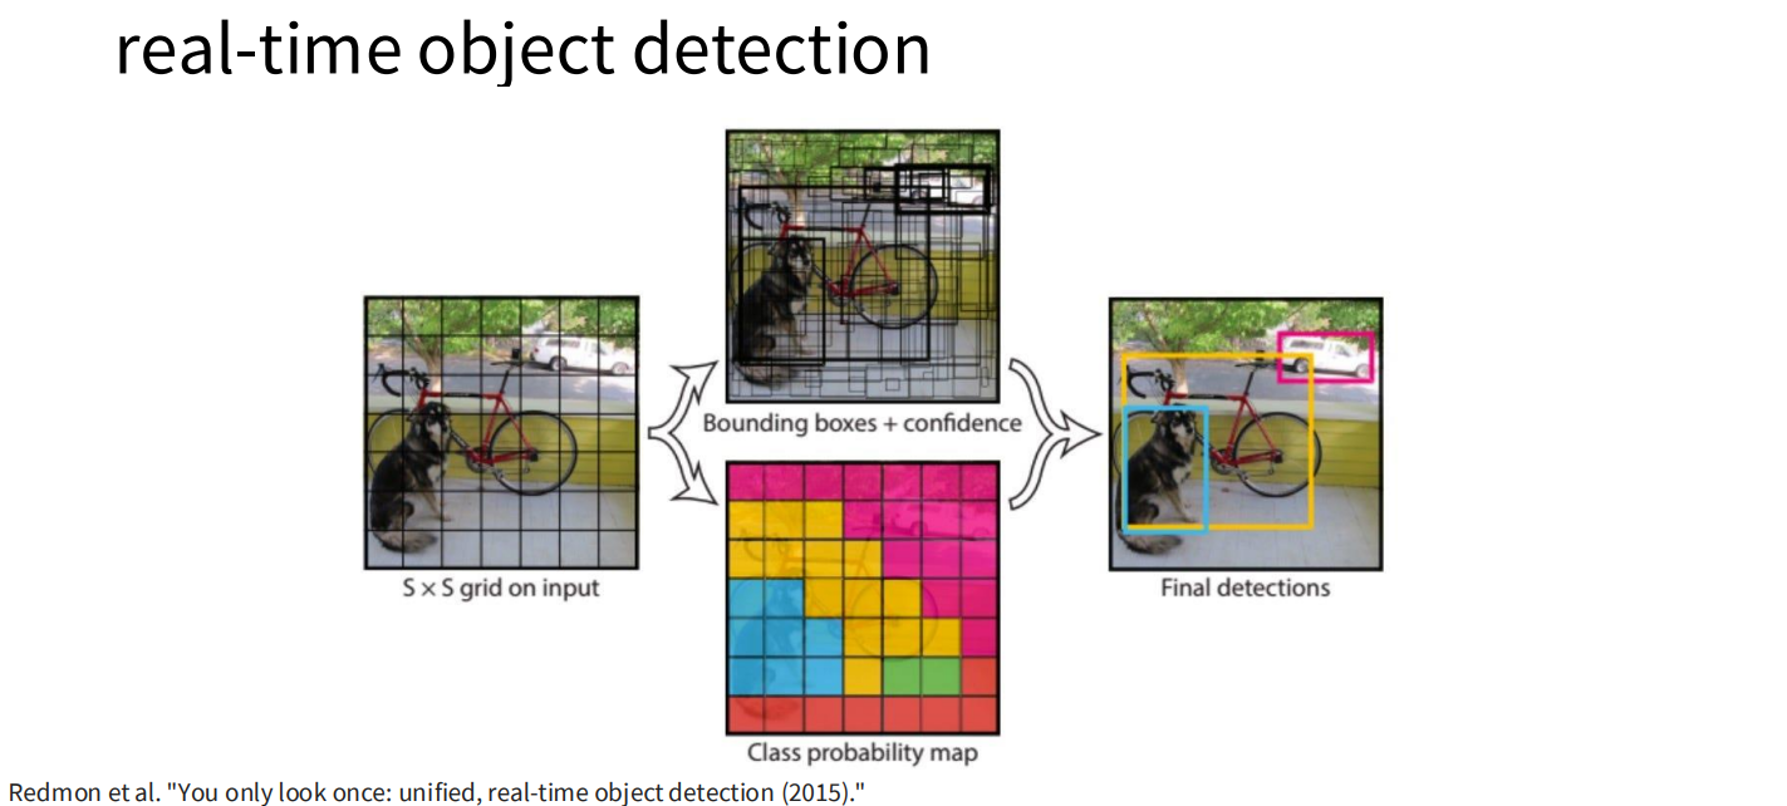
- YOLO (You Only Look Once): Divides the image into an grid for real-time detection.
- Fast R-CNN: Processes the image to generate a feature map, then applies region proposals.
Mathematical Formulation: For an image , the model predicts boxes and probabilities . The loss is:
where:
and is the ground-truth box, with balancing the losses.
PyTorch Implementation
Below is an example using Faster R-CNN from torchvision.
import torch
import torchvision
from torchvision.models.detection import fasterrcnn_resnet50_fpn
from torchvision.transforms import ToTensor

# Load pre-trained Faster R-CNN
model = fasterrcnn_resnet50_fpn(pretrained=True)
model.eval()

# Example input image
image = torch.randn(3, 600, 800)
images = [ToTensor()(image)]

# Perform detection
with torch.no_grad():
    predictions = model(images)

# Process predictions
for pred in predictions:
    boxes = pred['boxes']
    labels = pred['labels']
    scores = pred['scores']
    print(f"Detected {len(boxes)} objects")
This code detects objects using a pre-trained Faster R-CNN model, outputting bounding boxes, labels, and scores.
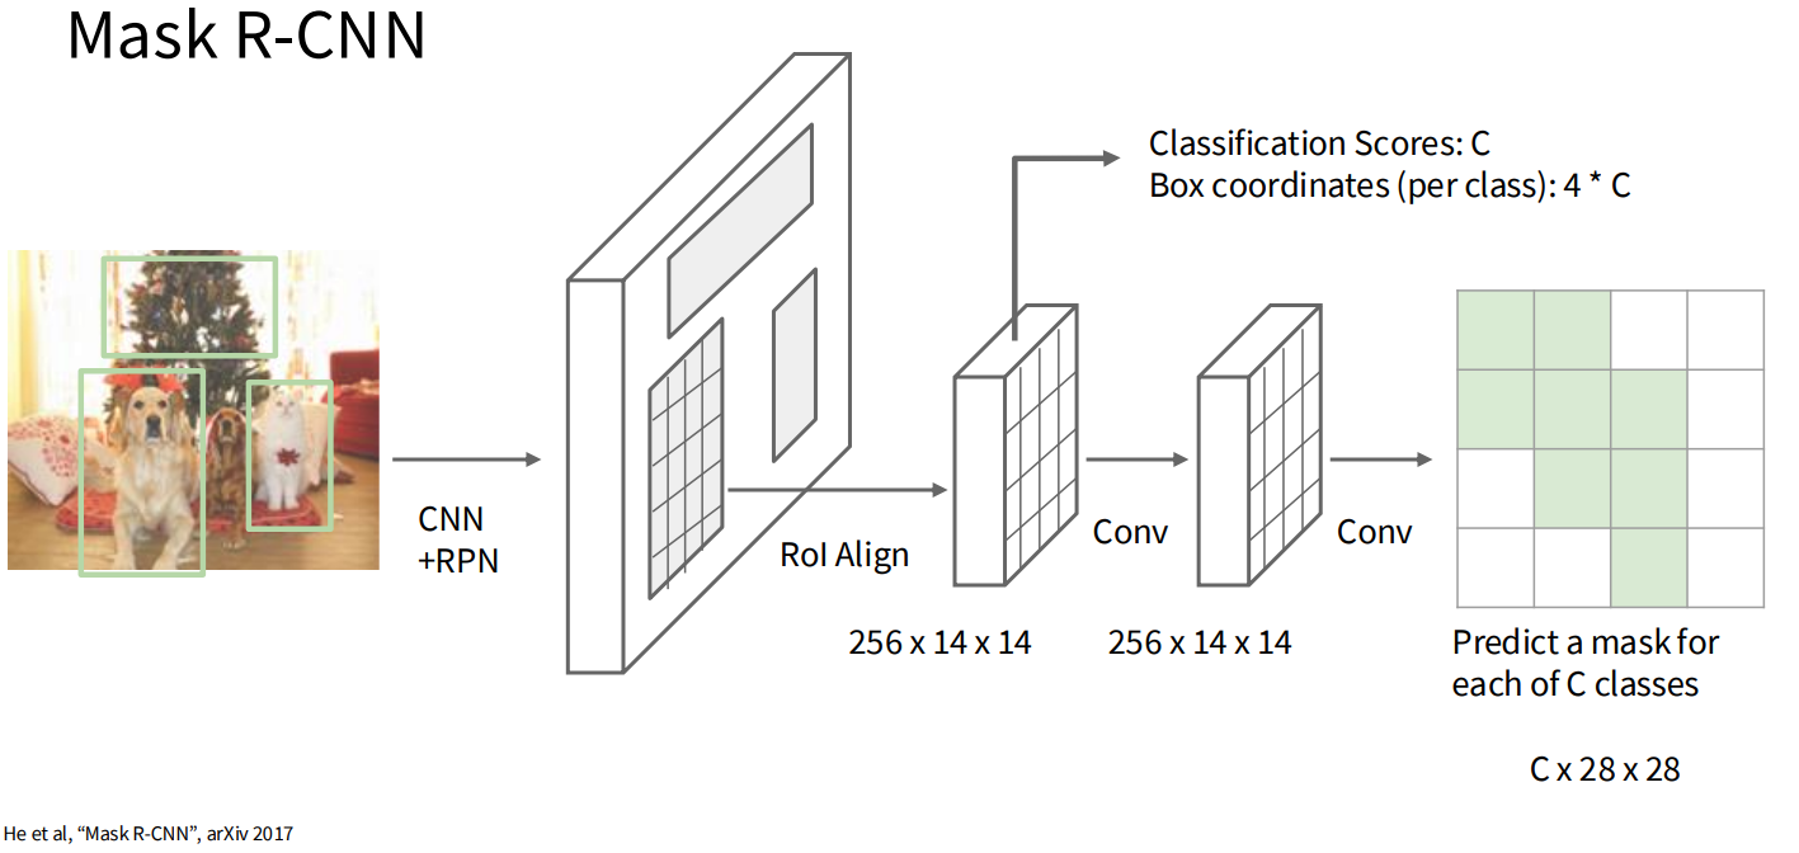
4. Instance Segmentation
Concept Explanation
Instance segmentation assigns class labels to pixels and distinguishes individual instances of the same class (e.g., separating two dogs). It produces a binary mask and class label per instance.
Key Challenges:
- Instance Differentiation: Separating same-class instances.
- Mask Accuracy: Generating precise pixel-wise masks.
- Integration: Combining detection and segmentation.
Approach:
- Mask R-CNN: Extends Faster R-CNN with a mask prediction branch for pixel-wise segmentation.
 Mathematical Formulation:
For each region proposal , Mask R-CNN predicts:
Mathematical Formulation:
For each region proposal , Mask R-CNN predicts: - Class probabilities .
- Bounding box coordinates .
- A binary mask of size (e.g., ).
The total loss is: where:and , are ground-truth and predicted mask values.
PyTorch Implementation
Below is an example using Mask R-CNN from torchvision.
import torch
import torchvision
from torchvision.models.detection import maskrcnn_resnet50_fpn
from torchvision.transforms import ToTensor

# Load pre-trained Mask R-CNN
model = maskrcnn_resnet50_fpn(pretrained=True)
model.eval()

# Example input image
image = torch.randn(3, 600, 800)
images = [ToTensor()(image)]

# Perform instance segmentation
with torch.no_grad():
    predictions = model(images)

# Process predictions
for pred in predictions:
    boxes = pred['boxes']
    labels = pred['labels']
    masks = pred['masks']
    scores = pred['scores']
    print(f"Detected {len(boxes)} instances with masks")
This code performs instance segmentation, outputting bounding boxes, labels, and masks.
Summary
This tutorial covered:
- Image Classification: Labels images using CNNs ().
- Semantic Segmentation: Labels pixels using U-Net or FCNs ().
- Object Detection: Detects objects with bounding boxes using Faster R-CNN or YOLO ().
- Instance Segmentation: Combines detection and segmentation with Mask R-CNN ().